Installing a storage interface card

Use this information to install a storage interface card in the blade server.

For more information about the ServeRAID H1135, see the Installation and User's Guide for ServeRAID H1135 at http://www-947.ibm.com/support/entry/portal/docdisplay?brand=5000008&lndocid=MIGR-5088601.

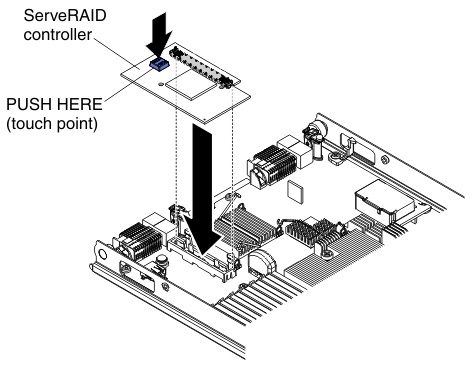
The storage interface card controls the SAS/SATA hot-swap storage drives. The following illustrations and installation instructions show how to install a ServeRAID H1135 controller into the CIOv expansion connector of the blade server. The illustrations and installation instructions are similar for other CIOv storage interface cards.


Graphic illustrating how to install a CIOv storage interface card.

To install a storage interface card, complete the following steps:

  1. Locate the CIOv expansion connector (see Blade server connectors).
  2. Touch the static-protective package that contains the storage interface card to any unpainted metal surface on the BladeCenter unit or any unpainted metal surface on any other grounded rack component; then, remove the storage interface card from the package.
  3. Orient the connector on the storage interface card with the CIOv expansion connector on the system board; then, press the storage interface card into the CIOv expansion connector.
  4. Firmly press on the indicated locations to seat the storage interface card.
    Note: For device-driver and configuration information to complete the installation of the expansion card, see the documentation that comes with the storage interface card.
  5. Install the cover or the optional expansion unit onto the blade server (see Installing the blade server cover).
  6. Install the blade server into the BladeCenter unit (see Installing the blade server in a BladeCenter unit).