Blade server control panel buttons and LEDs provide operational controls and status indicators.
Note: Figure 1 shows
the control-panel door in the closed (normal) position. To access
the power-control button, you must open the control-panel door.
Figure 1. Blade server control panel
buttons and LEDs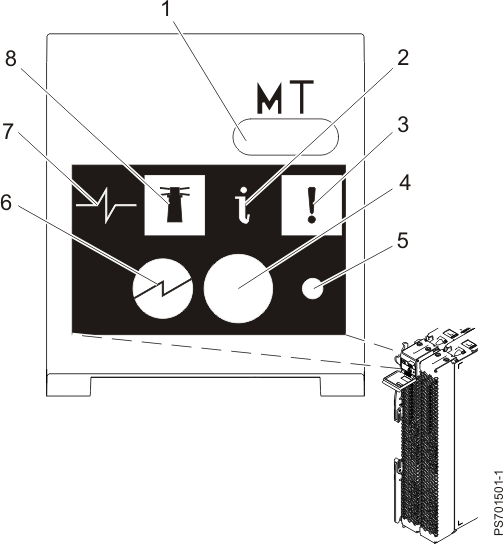
- 1
- Media-tray
select button: Press
this button to associate the shared BladeCenter® unit media tray (removable-media
drives and front-panel USB ports) with the blade server. The LED on
the button flashes while the request is being processed, then is lit
when the ownership of the media tray has been transferred to the blade
server. It can take approximately 20 seconds for the operating system
in the blade server to recognize the media tray.
If there is no response when you press the media-tray select button, use the management module to determine whether local control has been disabled on the blade server.
Note: The operating system in the blade server must provide USB support for the blade server to recognize and use the removable-media drives and USB ports.
- 2
- Information LED: When this amber LED is lit, it indicates that information about a system error for the blade server has been placed in the management-module event log. The information LED can be turned off through the Web interface of the management module or through IBM® Director Console.
- 3
- Blade-error LED: When
this amber LED is lit, it indicates that a system error has occurred
in the blade server. The blade-error LED will turn off after one of
the following events:
- Correcting the error
- Reseating the blade server in the BladeCenter unit
- Cycling the BladeCenter unit power
- 4
- Power-control button: This
button is behind the control panel door. Press this button to turn
on or turn off the blade server.
The power-control button has effect only if local power control is enabled for the blade server. Local power control is enabled and disabled through the Web interface of the management module.
Press the power button for 5 seconds to begin powering down the blade server.
- 5
- NMI reset (recessed): The nonmaskable interrupt (NMI) reset dumps the partition. Use this recessed button only as directed by IBM Support.
- 6
- Power-on
LED: This
green LED indicates the power status of the blade server in the following
manner:
- Flashing rapidly: The service processor is initializing the blade server.
- Flashing slowly: The blade server has completed initialization and is waiting for a power-on command.
- Lit continuously: The blade server has power and is turned on.
Note: The enhanced service processor can take as long as three minutes to initialize after you install the blade server, at which point the LED begins to flash slowly.
- 7
- Activity LED: When this green LED is lit, it indicates that there is activity on the hard disk drive or network.
- 8
- Location LED: When this blue LED is lit, it has been turned on by the system administrator to aid in visually locating the blade server. The location LED can be turned off through the Web interface of the management module or through IBM Director Console.