Remove the blade server from the BladeCenter® unit to access options, connectors, and system-board indicators.
Figure 1. Removing the blade server from the BladeCenter unit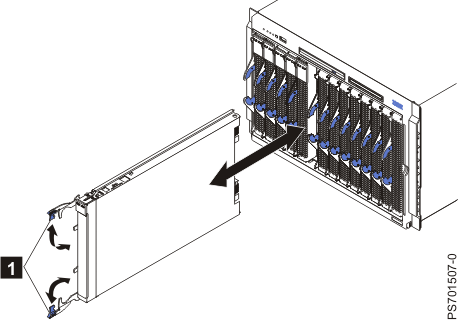
Attention:
- To maintain proper system cooling, do not operate the BladeCenter unit without a blade server, expansion unit, or blade filler installed in each blade bay.
- When you remove the blade server, note the bay number. Reinstalling a blade server into a different bay from the one where it was removed might have unintended consequences. Some configuration information and update options are established according to bay numbers. If you reinstall the blade server into a different bay, you might have to reconfigure the blade server.
Perform the following procedure to remove the blade server.
- Read
the Safety topic and the Installation guidelines.
- If the blade server is operating, shut down the operating system.
- Press the power-control button (behind the control-panel door) to turn off the blade server. See Turning off the blade server.
- Wait at least 30 seconds for the hard disk drive to stop spinning.
- Open the two release handles, as shown by 1 in Figure 1. The blade server moves out of the bay approximately 0.6 cm (0.25 inch).
- Pull the blade server out of the bay. Spring-loaded doors that are farther back in the bay will move into place to cover the bay temporarily.
- Carefully lay the blade server on a flat, static-protective surface, with the cover side up.
- Place either a blade filler or another blade server in the bay within 1 minute. The recessed spring-loaded doors move out of the way as you insert the blade server or filler blade.