Select MM Control → Login Profiles to manage user names and permissions.
The following illustration shows login profiles settings for an advanced management module.
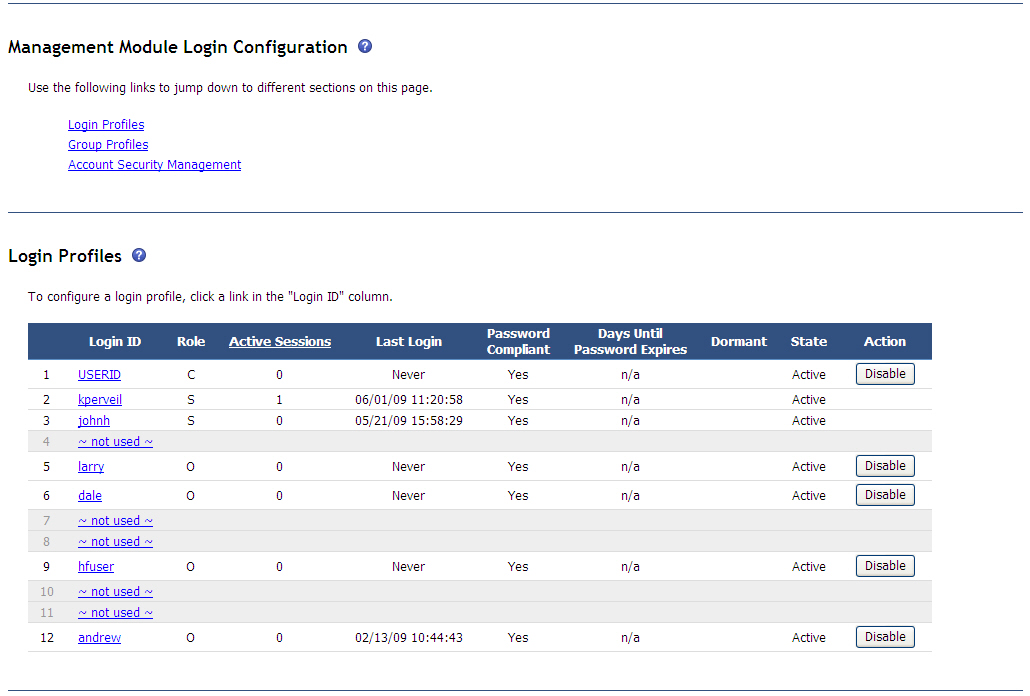
Up to 12 login profiles can be set up for the management module. Select Login Profiles to view information about each login profile. All management-module types display the login ID and role or access level that is assigned to each user: supervisor (S), operator (O), or custom (C).
For advanced management modules, the following information is also shown:
- Users that currently are logged in to the management
module.
- Click the Active Sessions column heading to view detailed information about each logged-in user or to terminate a logged-in user's session.
- Click the user Login ID to change a password and to set the maximum number of sessions that the user can have open at the same time.
- The date and time that each user last logged in.
- An indication of whether the user password is compliant with the current password policy that is set for the BladeCenter unit.
- The number of days that remain before each user password expires.
- An indication of whether a user profile is dormant (has not been used for a period of time that is specified by the inactivity alert period). The user must log in to recover from a dormant state.
- The state of each user profile: active or disabled. You can manually enable or disable operator and custom profiles by clicking a push button in the Action column.
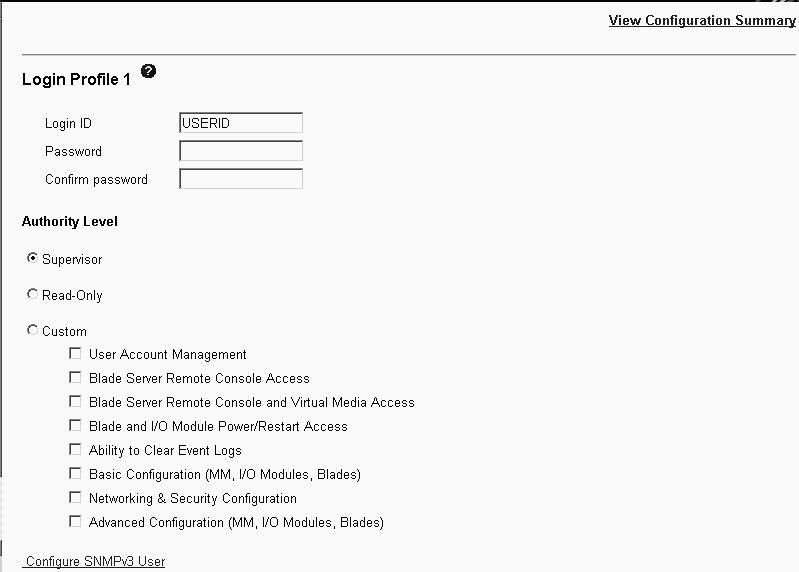
Click a login ID to configure settings that are specific to a login profile. You also can configure settings that apply to all of the login profiles. For an advanced management module, these settings are configured in the Account Security Management area. Click the login ID of an unused profile to set up a profiles for a new user.
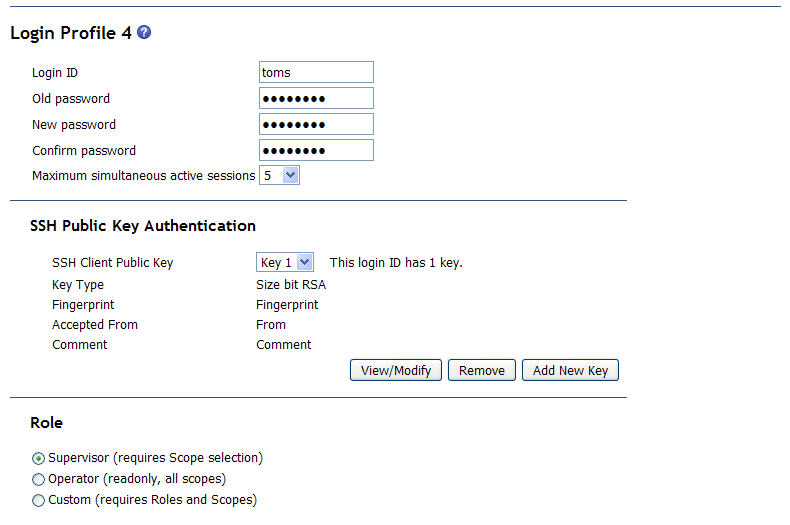
For each user profile, specify the following values:
- Login ID
- Password (requires confirmation)
- Role or Authority Level (default is Operator or Read-Only)
Defines the command areas that a user can access, according to the user's access scope. Roles or authority levels might vary according to the type of BladeCenter unit that you are using and the management-module firmware version that is installed.
- Access Scope
Defines where the role or user authority that is defined for a user is valid.
The following illustrations show the user profile settings.
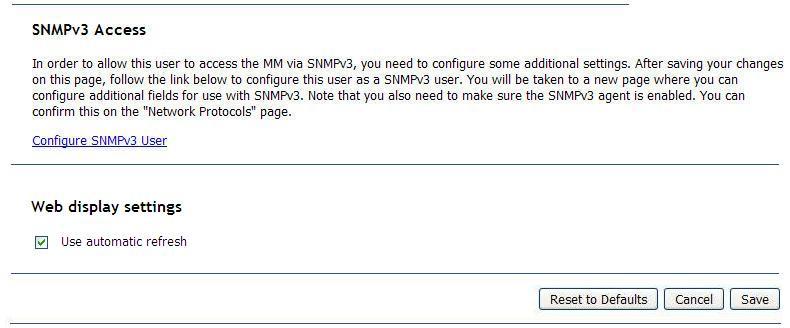
Click Configure SNMPv3 User to perform additional user configuration that is required for SNMPv3 (see Configuring SNMP for instructions). If automatic refresh for Web display settings is enabled for a user profile, all advanced management module user interface web pages that have auto-refresh capability will be automatically refreshed during web sessions for the user. If automatic refresh is disabled, there will be no automatic refresh for web sessions of this user.
The SSH Public Key Authentication section of the Login Profile page provides for adding, removing, viewing, or modifying the user's SSH public keys. As the Login Profile page is opened on the advanced management module, a summary of key information is displayed for the first key, if any, that is installed for the login profile. If more than one key is installed for the login profile, select the key that you want to view, modify, or remove from the list.
If no keys have been installed for this Login Profile, the only available push button is Add New Key.
Use the next page to import a public key, or paste the key data and install one.
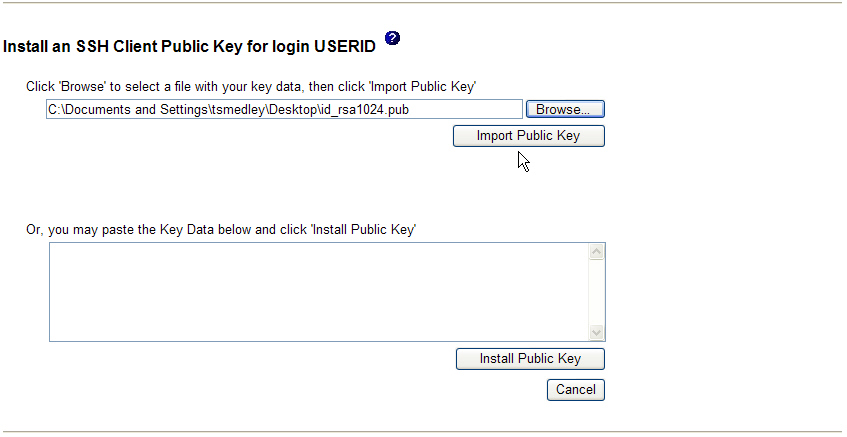
The advanced management module accepts SSH public keys that are formatted as OpenSSH-formatted public keys. Keys that are generated by the OpenSSH ssh-keygen program are acceptable. The length of the key can be up to 4096 bits. Key types ssh-rsa and ssh-dss are accepted. Normally, the key does not contain carriage return or line-feed characters, but these are acceptable when key data is pasted into the Key Data field. RFC4716-formatted keys cannot be imported through the web interface. Use the CLI to import RFC4716 formatted keys. The accepted key format contains up to four fields, as follows:
< Accepted From specification > < key type > < key data > < comment >
The < Accepted From specification > and <comment> parameters are optional. You can use a space character or tab character to separate the fields.
- <Accepted From specification>
- If this parameter is not used, the SSH public key is accepted from any host. If this parameter is used, it specifies the set of remote IP addresses and host names that can use this SSH public key to authenticate for the login profile. The format of the Accepted From specification is from=pattern-list .
- <key type>
- The key type must be either ssh-rsa or ssh-dss.
- <key data>
- The key data consists of displayable text characters. White-space characters, such as the space, tab, and line-feed, are not supported.
- <comment>
- This parameter can contain text information about the key. You can use this information to help track the various installed keys. The comment field is not used in the authentication process.
If the user has a public key, click View/Modify to view or export the selected key. You can also use this page to modify the Accepted From specification and Comment for the selected key.
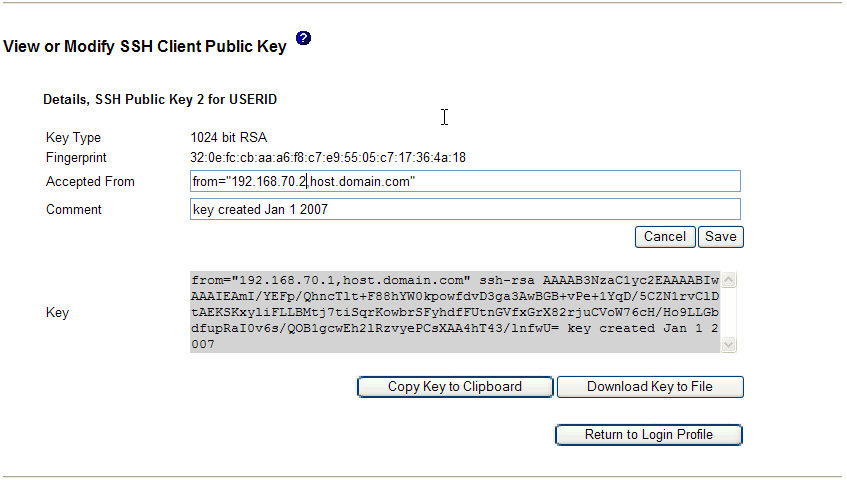
The fields on this page have the following functions:
- Key Type
- This field displays the number of bits in the key and the key type (DSA or RSA).
- Fingerprint
- This field displays a 128-bit MD5 fingerprint of the installed key.
- Accepted From
- If this field is blank, the SSH public key is accepted from any host. If this field is not blank, it specifies the set of remote IP addresses and host names that can use the SSH public key to authenticate.
- Comment
- This field can contain text information about the key. The administrator can use this information to help track the various installed keys. The comment field is not used in the authentication process.
You can update the Accepted From specification on this page by typing the new specification in the field and clicking Save. The format of the Accepted From specification is
from=pattern-list
where pattern-list is a comma-separated list of host names and IP addresses.
Each host name or IP address can contain wildcard characters * (asterisk) or ? (question mark), where the asterisk matches any string of characters and the question mark matches any single character. If a host name or IP address is preceded by ! (exclamation point), the key will not be accepted from a host that matches the host name or IP address. DNS must be enabled on the management module if host names are used in the Accepted From specification. The purpose of the Accepted From specification is to optionally increase security: public key authentication by itself does not trust the network, name servers, or anything (but the key). However, if an intruder somehow steals the private key that is associated with an installed public key, the key enables the intruder to log in from anywhere in the world. This additional option makes using a stolen key more difficult. In addition to the key, the name servers, routers, or both would need to be compromised also.
The following illustration shows user profile settings for older versions of management-module firmware.
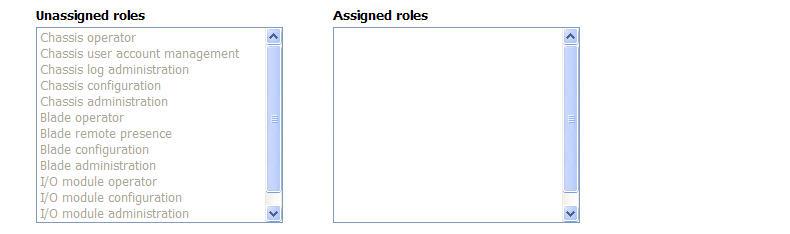
Several user roles (authority levels) are available, and each one gives a user write and execute access to different areas of management-module and BladeCenter component functions. Users with operator authority have read-only authority and can access management-module functions for viewing only. Multiple roles can be assigned to each user through the Custom role, and users with the Supervisor role have write and execute access to all functions within their assigned access scopes.
The following illustration shows the Account Security Management area for the advanced management module.
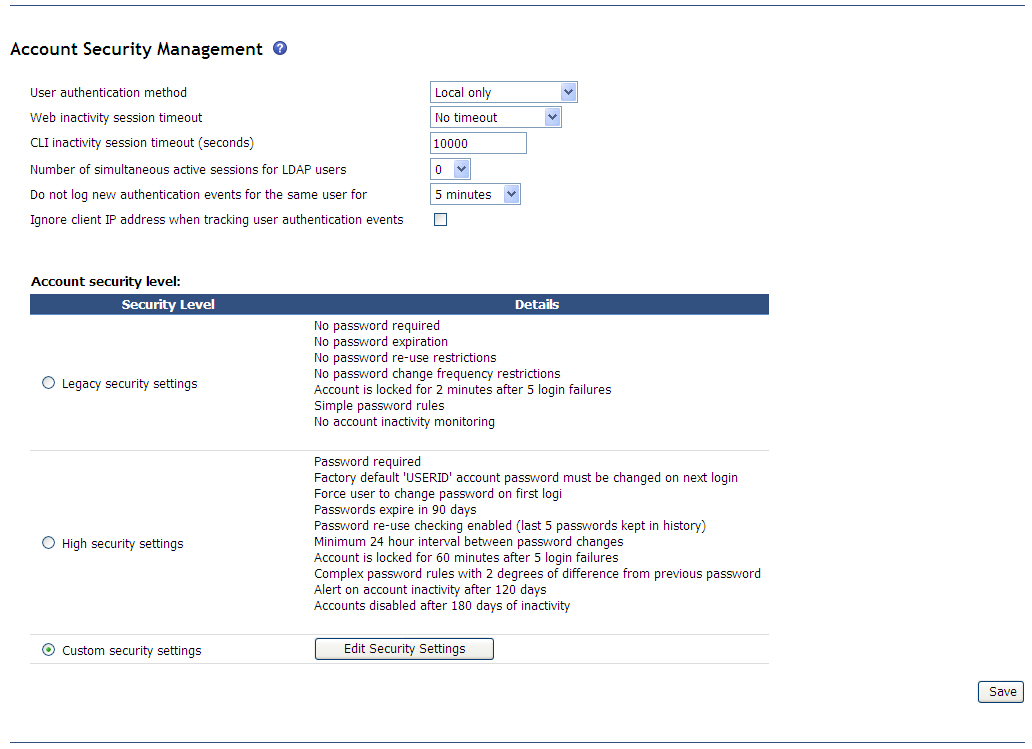
You can modify the following settings:
- The user authentication method (local, LDAP, or both).
- The session inactivity timeout for both the web and command-line interfaces.
- The number of simultaneous active sessions for LDAP users. This value applies to all LDAP users and specifies how many concurrent sessions each LDAP user can have. The minimum value is 1, and the maximum value is 20. A value of 0 means that there is no session limit for the user login profile.
- Whether to log new authentication events for the same user for a specified interval. Some scripts that access the management module can generate a large amount of user login and logout activity, which can then fill up the management module event log with login/logout events. Use this field to suppress the logging of some or all of these login/logout events. Select Log all to log all user login/logout events. Select Log none to stop logging these events completely. Use the other options to set the time period during which a user must be inactive before a new login entry is added to the event log. For example, if you select 5 minutes and an SNMP script has a user logging in to the management module every minute, only the first login is logged. This is a global setting that applies to all access methods and all users.
- Whether to ignore the client IP address when tracking user authentication events. This check box is unavailable if Log all or Log none is selected. Otherwise, this check box is available, and you can use it to specify whether a second login by the same user from a different client shall be considered new activity for logging purposes. If the check box is selected, the second login will not be considered new activity; otherwise, it is considered new activity. For example, if 5 minutes is selected in the Do not log new authentication events for the same user field, this check box is selected, and a script has a user logging in to the advanced management module every 3 minutes from two alternating clients, only the first login is logged. However, in the same scenario, if this check box is not selected, every user login is logged, because the user accesses the advanced management module from each client IP address every 6 minutes. This is a global setting that applies to all access methods and all users.
- The account security level that is to be applied to all user profiles. Two choices with preset values are available, along with a custom settings choice that enables individual values to be modified.
- The minimum password change intervals. This is a security feature
that limits how often users can change their passwords.Note: If account security settings require passwords, an event log entry is created for each user that does not have SNMPv3 access settings configured for password use.
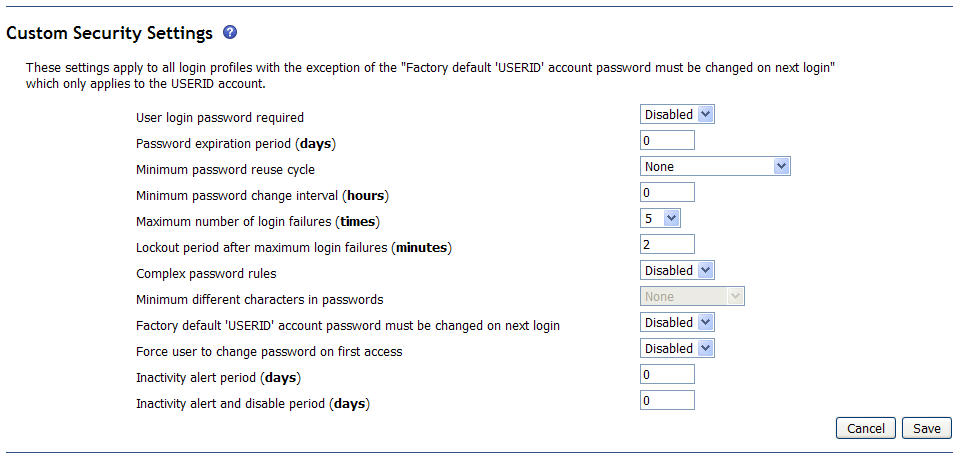
The following illustration shows the Custom Security Settings for the advanced management module.
Click View Configuration Summary to display the configuration settings for all BladeCenter® users and components.