Replacing an SSD carrier

You can replace a solid-state drive carrier in a PS703 blade server, or in either the base unit or the expansion unit of a PS704 blade server.

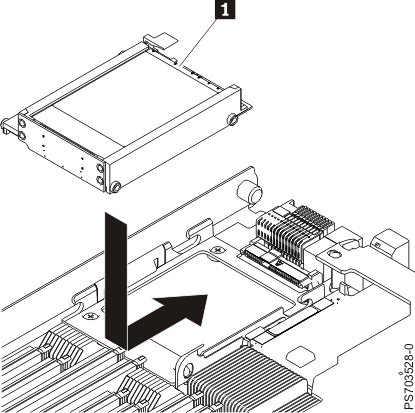
Figure 1 shows how to install the disk drive.

Figure 1. Replacing an SSD carrier
Replacing an SSD carrier

To replace an SSD carrier, complete the following steps.

  1. Read the Safety topic and the Installation guidelines.
  2. Shut down the operating system, turn off the blade server, and remove the blade server from the BladeCenter® unit. See Removing the blade server from a BladeCenter unit.
  3. Carefully lay the blade server on a flat, static-protective surface, with the cover side up.
  4. Open and remove the blade server cover. See Removing the blade server cover.
    Note: If you are servicing the base unit of a PS704 blade server, you must first remove the expansion unit. For more information, see Removing the expansion unit for a PS704 blade server.
  5. Locate the connector for the drive.
    Note: The SSD carrier case plugs in to the 2.5" SAS HDD connector.
  6. Install SSDs into the carrier case. See Installing an SSD.
  7. Place the carrier case  1  into the drive tray and push it toward the rear of the blade, into the connector until the drive moves past the lever at the front of the tray.
    Attention: Do not press the top of the carrier case. Pressing the top might damage the drive.
  8. Install and close the blade server cover. See Installing and closing the blade server cover.

    Statement 21

    Hazard! Electrical hazard!

    CAUTION:
    Hazardous energy is present when the blade server is connected to the power source. Always replace the blade server cover before installing the blade server.
  9. Install the blade server into the BladeCenter unit. See Installing the blade server in a BladeCenter unit.


Notices | Terms of use | Privacy | Support